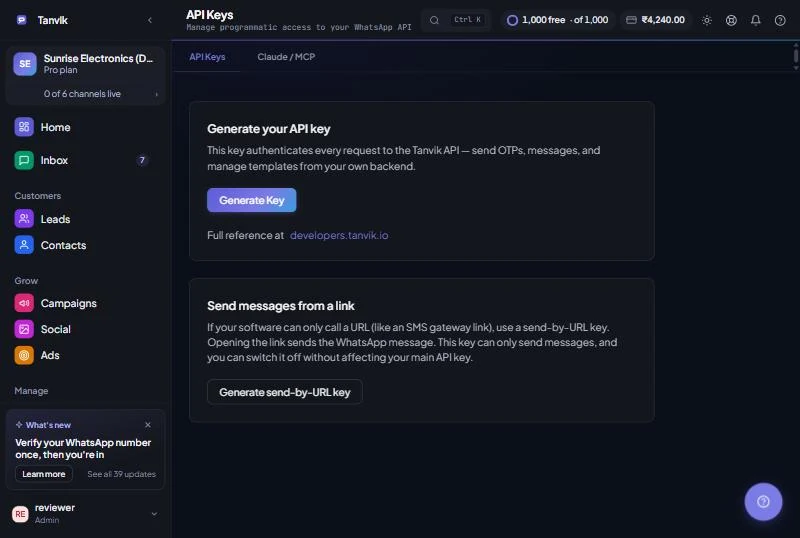
An API key lets your own software work with Tanvik: send WhatsApp messages and OTPs, manage templates and more, straight from your backend. The same key also connects Claude to your workspace, so you can ask Claude to check leads, look up your wallet balance or send a message. You choose exactly what Claude is allowed to do. If your software can only open a web link, a separate send-only key lets it send WhatsApp messages that way.
Before you begin
You need: (1) the Pro or Custom plan, which includes API access, and (2) to be a workspace admin. Teammates who are not admins see Admins only on this page.
To find it, open Settings in the sidebar and click Developer. The page has two tabs:
Tab
What it is for
API Keys
Generate, rotate or revoke your workspace API key, and get your Claude connector URL.
Claude / MCP
Turn each thing Claude can see or do in your workspace on or off.
If your plan does not include API access, you will see API access isn't enabled on your plan with a View plans button. See Plans & billing to upgrade.
Generate your API key
01
Open Settings → Developer
Stay on the API Keys tab. If you have no key yet, you see Generate your API key.
02
Click Generate Key
Confirm in the Generate new API key box by clicking Generate.
03
Copy the key now
Your full key is shown once, under Your new API key. Click Copy and store it somewhere safe, such as your server's secret settings or a password manager. Then click Done.
Tanvik never shows the full key again. After you click Done, the page only shows a short preview. If you lose the key, rotate it to get a new one.
04
Use it in your integration
Your key starts with tvk_. It authenticates every request to the Tanvik API. The full API reference is at developers.tanvik.io.
app.tanvik.io/api-keys
Rotate or revoke a key
Each workspace has one API key at a time. Once a key exists, the API Keys tab shows Your API key with a preview and two buttons.
Button
What it does
When to use it
Rotate
Creates a new key. The old key stops working immediately. The new key is shown once.
You lost the key, a developer left, or you think the key was exposed.
Revoke
Deletes the key. Every integration using it stops working at once. This cannot be undone.
You no longer use the API and want to shut off access completely.
Update your systems straight after rotating. Anything still using the old key will stop working until you give it the new key. If Claude stops working after a rotation, reconnect it with the new key.
Connect Claude to your workspace
Tanvik works as a custom connector in Claude. Once connected, Claude can use your Tanvik workspace as a tool, only for that workspace.
01
Copy your connector URL
On the API Keys tab, find the card Connect Claude to this workspace and click Copy URL. The URL is unique to your workspace, so you can connect several Tanvik workspaces to the same Claude account.
02
Add it in Claude
In Claude, go to Settings → Connectors → Add custom connector and paste the URL.
03
Authorize with your API key
Claude opens a page called Connect Claude to Tanvik. Paste your API key and click Continue.
04
Confirm the workspace
The page shows the Workspace name linked to that key. Check it is the right one, then click Connect this workspace. If it is wrong, click Use a different key.
05
Choose what Claude may do
Open the Claude / MCP tab and switch on the actions you want to allow. See the next section.
Test it first. Right after you generate a key, the page shows a Test connection now button. If all is well you see "Connected" with the number of tools available. A step-by-step setup guide is at developers.tanvik.io/claude.
Choose what Claude can do
The Claude / MCP tab has a switch for each tool. These switches apply to Claude and to any other app connected with your Tanvik API key. Changes save as soon as you flip a switch.
Read-only (Claude can view this) · on by default
Looking things up, for example get_leads, get_contacts, get_wallet_balance, list_templates, list_automations and get_campaign_report.
Actions (Claude can do this) · off by default
Anything that sends messages, creates records or changes data, for example send_whatsapp_message, send_template_message, create_lead and enroll_contact_automation.
Start with read-only
Let Claude look things up first. Turn on actions one at a time, once you are happy with how you use it.
Don't switch on sending unless you need it
Sending tools send real WhatsApp messages to real customers, and messages are charged from your wallet.
If you open this tab before generating a key, you see Connect Claude first with a Go to API Keys button.
Send messages from a link
Some software, such as billing or accounting tools that send SMS through a gateway link, can only open a web address. For those, the API Keys tab has a second card, Send messages from a link. Click Generate send-by-URL key to get a separate key that starts with tvku_. It can only send messages. It does not work as your main API key, and you can rotate or revoke it without breaking anything else.
You can also let another system, such as your website, Shopify or a form tool, add a contact to one of your automations. This uses a webhook trigger on the automation. Automations are included on Pro and Custom.
01
Open and save your automation
Go to Automations and open the automation. The Webhook trigger section appears in the builder once the automation has been saved.
02
Click Generate key
A webhook key appears in the list. Click Copy URL + key to copy the endpoint and the key together.
03
Send a POST request from your system
Your system posts to the endpoint shown under Endpoint, with a JSON body like the Example payload in the builder: webhook_key, contact_phone, contact_name and an optional metadata object. The contact is then enrolled in the automation.
Each key has an on/off switch, and shows how many times it has been triggered and when it was last used. Switch a key off to pause it without deleting anything.
Common questions
I see "Admins only".
Only workspace admins can generate or revoke keys and change Claude's permissions. Ask an admin in your team.
Claude says a server with this URL already exists.
That workspace is most likely connected to your Claude account already. Check your connectors list in Claude. To add a different workspace, copy the URL from that workspace's Developer page.
The Connect page says parameters are missing.
The page was opened directly instead of from Claude. Start again from Claude by adding or reconnecting the connector.
Claude can read data but will not send messages.
Action tools are off by default. Turn on send_whatsapp_message or send_template_message on the Claude / MCP tab.
My integration stopped working suddenly.
Check whether someone rotated or revoked the key. Generate a new key if needed and update every system that uses it.