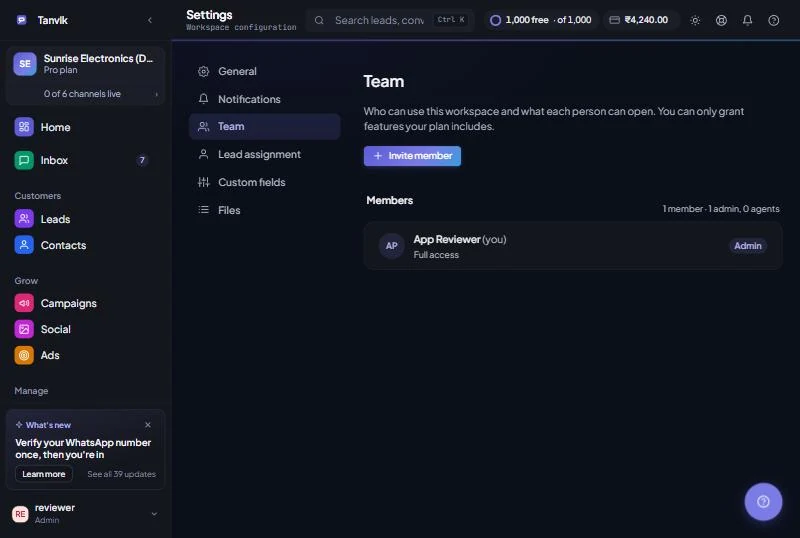
Bring your sales and support staff into Tanvik so everyone works from the same chats and leads. You decide who is an Admin and who is an Agent, which features each agent can open, and how new leads and chats are shared out between them.
app.tanvik.io/settings?tab=team
Before you begin
Only admins can manage the team. Open Settings › Workspace in the sidebar and choose Team. It lists your members and shows how many are admins and agents. Lead sharing has its own section next to it, Lead assignment. Agents who open either one see an "Admins only" message.
You'll need each teammate's email address. If they already use Tanvik (for example in another workspace), you can add them directly without a new password.
Admins and agents
Role
What they can do
Admin
Full access: everything your plan includes, plus billing, workspace settings and team management. Admins can invite agents and admins, change permissions and assign chats.
Agent
Inbox, messaging and conversation management. An agent only sees the features you switch on for them. An agent whose access hasn't been set yet can open Inbox, Leads and Contacts.
Choosing Admin asks you to confirm with Grant full admin access?. An admin can see billing and can invite or remove other members. Only grant it to people you fully trust.
Invite a teammate
01
Click Invite member
In the Team section, click Invite member. Choose Invite a new member (they get an email and create a password) or Add an existing Tanvik user (they already have a Tanvik account).
02
New member: enter email and role
Type their Email address, pick Agent or Admin, and click Send invite. The invite link expires in 7 days. If that email already has a Tanvik account, Tanvik switches you to the add-existing flow automatically.
03
Existing user: find and add
Enter Their Tanvik email and click Find. When the account is found, pick a role and click Add to workspace. They get an email telling them they've been added. If no account exists, click Invite them as a new member instead.
04
Set their permissions
For agents, open Details on their row and choose which features they can open (see Permissions below).
If the invite email can't be delivered, Tanvik copies the invite link to your clipboard instead. Paste it to your teammate on WhatsApp.
What your teammate does
01
Open the invite link
The page says Join followed by your workspace name and shows the role they were invited as.
02
Create the account
They enter Your name, then Create a password (at least 8 characters) and Confirm password, and click Create account & join. Their email is fixed to the address you invited.
03
Sign in
They see Account created! and click Go to sign in to log in with their email and new password.
Pending invites
Invites that haven't been accepted yet appear under Pending invites, with the role and how many days are left. Click Copy link to share the invite link again, or Cancel invite to withdraw it. A cancelled or expired link stops working; send a fresh invite if needed.
Choose what each agent can open
01
Open the agent's Details
Each agent's row shows a line such as "3 of 12 features". Click Details to expand it. Admin rows say Full access.
02
Tick the features they need
Under What (name) can open, only features included in your plan are listed, such as Inbox, Leads, Contacts, Templates, Campaigns, Automations, Analytics, RCS, AI Agent, Flows, Calling, Social Suite and the Commerce pages.
03
Click Save access
You see Access saved. The agent sees the change the next time they open or reload a page. Anything you untick disappears from their sidebar.
Permissions can only grant features your plan already includes. If a feature is switched off for your workspace, nobody sees it, admins included. If your workspace has more than one WhatsApp number, agents only see the numbers they have been given access to.
Share out new leads automatically
Open Settings › Workspace › Lead assignment and switch on Assign new leads automatically. Each new lead then goes to the next available agent. Admins are never assigned this way, and agents marked unavailable are skipped. You can still reassign any lead by hand.
Setting
What it does
When no rule matches
Choose Take turns (goes through agents in order) or Least busy (picks whoever has the fewest open leads). It applies whenever no routing rule fits.
Routing rules
Send certain leads to one agent. Click Add rule and set If lead source is (Any source, Form, WhatsApp, Website, Campaign, Import or Manual), And tagged (optional, comma separated), And deal value at least (optional), Assign to and Priority. Rules are checked in order, lowest number first, and the first match wins. Each rule has Pause and Delete. You need at least one agent before you can add a rule.
Agents
Each agent has a switch: Gets new leads or Skipped for new leads. Turn it off while someone is away. Leads they already have stay with them.
Lead alerts
In the Team section, open an agent's Details. Add their WhatsApp number and switch on Message on WhatsApp to send them a message each time a lead is assigned, on top of the in-app alert.
Assign a lead by hand: open the lead, go to the Details tab, pick someone under Owner and click Save changes. More in Manage leads in the pipeline.
Assign chats
01
Open the conversation
In Inbox (called Chats on your phone), open the conversation you want to hand over.
02
Click Assign
Admins see an Assign button in the conversation header (it shows the agent's name once assigned). In Assign conversation, pick an agent, or Unassigned, and click Assign.
03
Agents find their chats
Agents click the Mine chip to see chats assigned to them plus unassigned ones, or tick Assigned to me in the Filters menu to see only their own.
Remove a member
Open Details on the member's row, click Remove from workspace and confirm. You can't remove yourself, and admins can't be removed from this screen; to remove an admin, chat with us.
If the person doesn't belong to any other Tanvik workspace, removing them permanently deletes their Tanvik account. If they're just away, switch them off for new leads under Lead assignment instead.
Common questions
Give agents only what they need
A support agent usually needs Inbox and Contacts, not Campaigns or Billing. Fewer menu items also means fewer mistakes.
Don't share one login between people
Invite each person separately so chats, notes and lead assignments show who did what.
"A pending invite already exists for this email". An invite is still waiting. Use Copy link on it, or cancel it and send a new one.
My teammate sees "Invite expired" or "Invite not found". The link is older than 7 days, was cancelled, or was already used. Send a fresh invite.
An agent can't see a page they need. Open their Details, tick the feature and click Save access. If the feature isn't in the list, it isn't part of your plan.
New leads aren't being auto-assigned. Check that Assign new leads automatically is on and that at least one agent is set to Gets new leads.