Workspace settings and WhatsApp profile
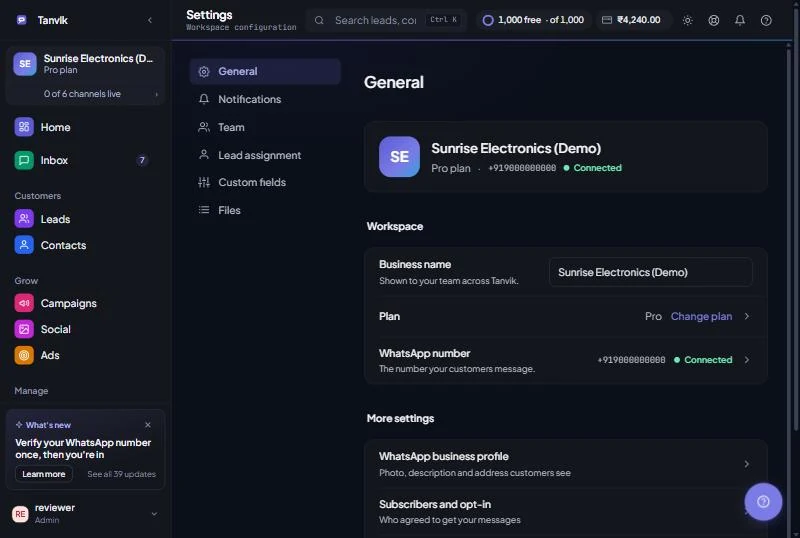
Open Settings in the sidebar (under Manage). It expands into these pages:
| Menu item | What it opens |
|---|---|
| Workspace | The settings page covered in this article. |
| Channels & WhatsApp | Connect and check your WhatsApp number and other channels. Your WhatsApp business profile and opt-in list are tabs here. |
| Billing & Wallet | Your plan, invoices and wallet balance. |
| Developer | API keys (only if your plan includes API access). |
| Help Center / Support Tickets | These help articles, and support tickets with our team. |
You can also click your name at the bottom of the sidebar for a quick menu with Profile and Sign out. Profile opens the General section.
On the Workspace page the sections are listed down the left (as a row of tabs on a phone). Which ones you see depends on your role:
| Section | Who sees it |
|---|---|
| General | Everyone. Agents can read it but only admins can change the business name. |
| Notifications | Everyone. The daily summary switch is for admins only. |
| Team | Admins only. See Add teammates and set permissions. |
| Lead assignment | Admins only. Also covered in the Team article. |
| Custom fields | Admins only. |
| Files | Admins, and agents who have been given File storage access. Files is included from the Pro plan. |
An agent who opens an admin-only section sees an "Admins only" message instead.
This section decides how Tanvik lets you know about new customer messages and leads.
| Setting | What it does |
|---|---|
| Daily summary on WhatsApp (admins) | Every morning at 9 am you get a WhatsApp message with the day before: new leads, conversations and AI Agent activity. This applies to the whole workspace. |
| Browser notifications | Click Turn on to get a notification when a customer messages you or a lead turns hot, even when Tanvik is in another tab. Send a test shows one straight away and Turn off stops them. |
| Message sound | A soft chime when a customer message arrives while Tanvik is open. Play sample lets you hear it. The unread count in the tab title stays on either way. |
Browser notifications and the message sound belong to the browser you are using now. Turn them on again in each browser or device you use.
Custom fields let you keep information that is specific to your business, like an EMI amount, a city or a model name, on contacts, leads and orders.
Use a field in messages and automations with its key, for example {{lead.city}}. Click Edit on a field to rename it or change its options, Required and list settings.
Files is your library of brochures, price lists and media. Your team can send these from Inbox, and the AI Agent can send them to customers. It is included from the Pro plan.
| File type | Largest file WhatsApp accepts |
|---|---|
| Images | 5 MB |
| Video and audio | 16 MB |
| Documents (PDF, Word, Excel, PowerPoint, TXT) | 100 MB |
The Storage bar at the top shows how much of your workspace's storage is used. When it says "Storage is full", delete a file before uploading a new one.
This is what customers see when they tap your business name in WhatsApp. Open it from Settings › Channels & WhatsApp and the Business profile tab, or from More settings in General.
For your number's quality, daily sending limit and connection, see the Overview tab on Channels.
When your workspace has two or more active WhatsApp numbers, a row of number tabs appears at the top of Home. Each tab shows the number's display name and phone number. Click a tab to switch, and Tanvik remembers your choice on this device. The Inbox has its own number picker.
Your workspace name is shown at the top of the sidebar. If your account belongs to more than one workspace, click the name to open Switch workspace and pick another. Tanvik reloads into that workspace. If you only belong to one workspace, the name is just a label and can't be clicked.
I can only see General, Notifications and maybe Files. You are signed in as an agent. Team, Lead assignment and Custom fields are managed by your workspace admin.
I can't change my plan here. Plan is a link, not a setting. Admins click Change plan to go to Billing & Wallet.
"Saved locally. WhatsApp push failed". Your details were saved in Tanvik but WhatsApp rejected the update. Check the website and email formats, then save again.
How do I switch between light and dark mode? Use the theme button in the top bar.
Was this article helpful?