Sell on WhatsApp: catalog, orders and payments
Commerce is part of the Pro plan (and Custom plans that include it). When it is on for your workspace, you will see Commerce in the sidebar under Manage, with four pages:
| Sidebar item | What it opens |
|---|---|
| Overview | Your store at a glance. Tabs at the top also open Analytics, Loyalty and Appointments, when they are switched on for you. |
| Orders | Every order, with its next step. |
| Products | Your catalog. Add products and sync them to WhatsApp. |
| Integrations | Connect Shopify, WooCommerce, Shiprocket and Razorpay. See Integrations and Connect Shopify. |
To show products inside WhatsApp you also need a Meta catalog (created in Meta Commerce Manager) that is linked to your WhatsApp Business Account. You can still add products and take orders in Tanvik without one.
Two more tools are covered in Appointments, loyalty and kitchen display.
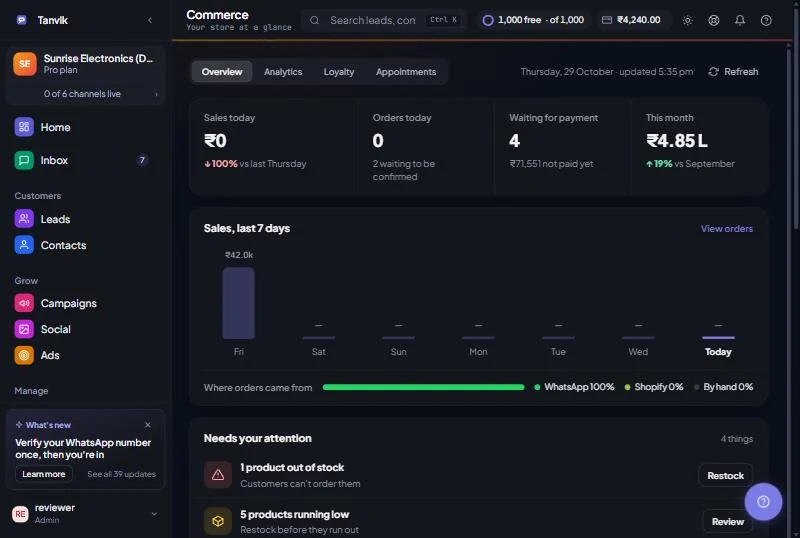
Go to Commerce → Overview. The page updates by itself when an order changes, and Refresh at the end of the tab row reloads it on demand. Next to it you see the day and the time it was last updated.
Once you have orders, the page shows:
| Card | What it shows |
|---|---|
| Sales today | Paid orders placed today, compared with the same weekday last week. |
| Orders today | Orders that came in today, and how many are waiting to be confirmed. |
| Waiting for payment | Orders not paid yet, and their total value. |
| This month | Paid orders this month, compared with last month. |
| Sales, last 7 days | Paid sales for each day, plus Where orders came from: WhatsApp, Shopify or by hand. |
| Needs your attention | Products out of stock or running low, orders waiting for payment, and new orders to confirm. Each row has a button that opens the right page. When there is nothing to do it says All caught up. |
| Orders | How many orders are New, Confirmed, Packing, Shipped and Delivered, and your five most recently updated orders. |
| Best sellers this week | The products customers ordered most in the last 7 days, with a stock label. Until there are sales it lists your products instead. |
A store with no orders yet sees a short checklist instead: Connect WhatsApp, Add your products, Turn on payments and Take your first order. Each step shows Done when it is finished and has a button for the next one. Below it you can connect Shopify and Razorpay straight away.
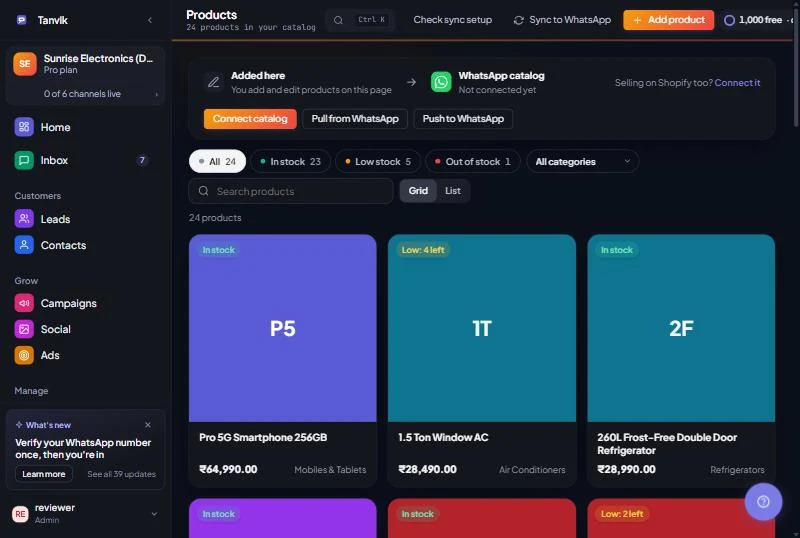
The line at the top of Commerce → Products tells you where your products come from. Added here means you add and edit products on this page. Synced from Shopify means they come from your Shopify store automatically (see Connect Shopify). Next to it you see whether your WhatsApp catalog is connected and when it last synced.
| Field | What to know |
|---|---|
| Name | Required. This is what customers see. |
| SKU | Required and must be unique. It is your product code and the product's ID in your WhatsApp catalog, so it can't be changed later. To change it, delete the product and add it again. |
| Category | Pick one from the list or type your own. Categories appear in a menu above the product list so you can filter by them. |
| Unit | None, pcs, kg, g, litre, ml, box, pack or dozen. |
| Warn me at | The stock level that marks a product as low. Default is 5 left. |
| Hide on WhatsApp when it runs out | On by default for new products. Customers won't see the product until it is back in stock. |
Above the list you can filter by All, In stock, Low stock or Out of stock (each shows a count), pick a category, search by name, and switch between Grid and List. Your choice of view is remembered. Click a product to edit it. The editor has a Delete product button, which removes the product from Tanvik and from your WhatsApp catalog. If it can't be removed from WhatsApp, Tanvik tells you it may still show there.
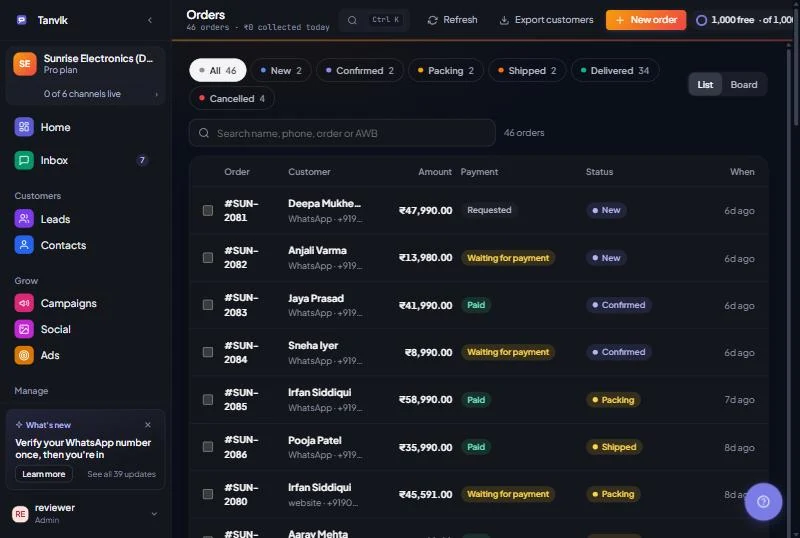
Commerce → Orders lists every order, whether it came from WhatsApp, Shopify or was added by hand. The top bar shows how many orders you have and how much was collected today. Use the status chips (each shows a count) to filter, and search by name, phone, order number or AWB. Switch between List (the default) and Board, where each status is a column. Your choice is remembered.
| Status | Meaning |
|---|---|
| Needs address | The customer is ordering over WhatsApp and hasn't given a delivery address yet. |
| Choosing payment | The customer hasn't chosen how to pay yet. These two statuses sit under the Waiting on customer chip, which only appears when there are such orders. |
| New | Order placed, waiting for you to confirm it. |
| Confirmed | You have accepted the order. |
| Packing | Being packed. |
| Shipped | Handed to a courier. |
| Delivered | Received by the customer. |
| Cancelled / Refunded | Both appear under the Cancelled chip. |
Bulk actions: tick the box on several orders to show Mark shipped, Push to Shiprocket, Notify customers and Clear. Mark shipped only changes the status. Use Notify customers to send the WhatsApp message for each selected order's current status.
Taking an order by hand: click New order, enter the customer's Phone (and name), pick a Product and Quantity, set Payment to COD / Pending or Already paid, add notes, and click Create order. It appears as a New order. A hand-made order holds one product.
Export customers: workspace admins see an Export customers button that downloads a spreadsheet with one row per customer: name, phone, number of orders, total spent, first and last order date and last order number. Cancelled orders and orders without a phone number are left out.
Send payment link on an unpaid order creates a payment link for the order total and sends it to the customer on WhatsApp. First, connect a payment gateway:
Open Commerce → Overview and click the Analytics tab. It shows the last 7 days. For 30 or 90 days, open Analytics and use its Commerce tab, where 7d, 30d and 90d buttons let you change the period. Most numbers are compared with the previous period of the same length.
| Report | What it tells you |
|---|---|
| Gross merchandise value | Value of paid orders in the period. |
| Avg order value | Average value per paid order. |
| Total orders | Orders placed in the period. |
| Delivery rate | Share of orders that reached Delivered. |
| Revenue by Day | Paid revenue for each day. |
| Order Funnel | How many orders reached each step from placed to delivered. |
| Top Products | Best sellers by revenue, with units sold. |
| Repeat Customers | How many buyers ordered more than once. |
| Order Sources | Where orders came from. |
| Retention Cohort | Paying customers grouped by the month of their first order, showing how many came back later. |
| Low Stock Alert | Products that are running low. |
Orders that have no recorded date can't be counted in any period. If you have some, a note under the summary says how many are left out.
| Problem | What to do |
|---|---|
| "Not live on WhatsApp yet" after saving a product | The product saved in Tanvik but didn't publish. Check that your catalog shows Connected, then click Push to WhatsApp. |
| "Connect a catalog first before pushing" | Click Connect catalog and link your Meta catalog first. |
| "That SKU already exists" | Each product needs its own SKU. Use a different one. |
| "No payment gateway connected" | Connect Razorpay or PayU on the Payment Gateway page (see above). |
| "WhatsApp notify skipped" | The customer's 24-hour window has closed. Reach them from Inbox with a template. |
| My edits to a product keep changing back | The product syncs from Shopify. The next Shopify sync can overwrite edits made in Tanvik, so edit it in Shopify instead. |
| I can't see Commerce, or one of its tabs | Message our team. Commerce and each of its tools are switched on per workspace. |
Was this article helpful?