Connect Shopify and other store integrations
You need:
| Requirement | Why |
|---|---|
| Commerce on your plan | Integrations live under Commerce → Integrations in the sidebar (Commerce is part of Pro and Custom). If you don't see Commerce in the sidebar, message our team. |
| Your .myshopify.com domain | Find it in Shopify Admin → Settings → Domains. Your custom domain won't work here. |
| A Shopify app's Client ID and Client secret | From the Shopify Dev Dashboard → your app → Settings → Credentials. Apps created in Shopify admin before January 2026 can use an Admin API access token instead. |
| Field | What to enter |
|---|---|
| Shop domain | Required, e.g. your-store.myshopify.com. |
| Storefront domain | Optional. The domain customers see, e.g. yourbrand.com. Product links sent on WhatsApp use it. Leave blank only if you have no custom domain. |
| Client ID / Client secret | From your app's credentials page. The secret is also used to verify incoming updates. |
| Admin API access token (legacy apps only) | Only for custom apps made in Shopify admin before January 2026. Leave blank if you use a Client ID and secret. |
| Webhook secret | Optional. Normally the same value as the Client secret. |
Once connected, these update on their own as soon as they change in Shopify:
| Data | Where you see it in Tanvik |
|---|---|
| Orders (new, updated, paid, cancelled, fulfilled) | Commerce → Orders (marked as coming from Shopify) and the Orders tab of the Shopify store tab |
| Products and stock levels | Commerce → Products, which shows Synced from Shopify |
| Customers | The Customers tab of the Shopify store tab |
| Checkouts and refunds | Used for abandoned cart and order messages (see below) |
A safety-net check also runs every 15 minutes to catch anything that was missed. The Live sync card on the Shopify store tab's Overview shows when each type of data last came in.
Open Commerce → Integrations and click the Shopify store tab (or Store on the Shopify row). The top shows your store, when it last synced, and buttons for Open in Shopify and Force Full Resync. Below are Revenue (30d), Avg order value, Unfulfilled orders and your Catalog size. Refresh reloads the tab.
| Tab | What you can do |
|---|---|
| Overview | Quick actions, the Live sync card and your Last 30 days (total, paid and fulfilled orders). |
| Orders | Filter All, Unfulfilled or Fulfilled. Open an order to Fulfil order, Update tracking (once it has been dispatched) or Cancel order. Cancelling also cancels it in Shopify. |
| Shipments | Every dispatched parcel with status, courier, AWB, dispatch and delivery dates, and a Track link. Parcels with no movement for over 4 days are flagged stuck. |
| Products | Search, switch between Grid and List, add a product with New product, edit or delete. Status can be Active, Draft or Archived. Deleting removes the product from Shopify. |
| Customers | Name, phone, number of orders, total spent and city. |
| Discounts | New discount: enter a Discount code, pick Percentage off or Fixed amount off (₹), set the Value and an optional Usage limit, then Create. |
| Webhooks & Settings | See the registered webhooks and recent events, Re-register all, or Disconnect Shopify. |
With Shopify connected, go to Automate → Automations. At the top you'll see ready-made Shopify automations built on your store's events (once you have several automations of your own, they sit under Start from a ready Shopify automation). Pick one, review it, and click Set up → to switch it on. You can also build your own with these triggers:
| Trigger | When it fires |
|---|---|
| Order Created | A new order is placed. Use {{order.order_number}} and {{order.total}}. |
| Order Status Changed | An order moves to the status you pick, e.g. shipped or delivered. |
| Payment Received | An order is marked paid. Good for thank-you messages. |
| Cart Abandoned | Someone starts checkout but doesn't finish. Use {{cart.total}}, {{cart.items}} and {{cart.checkout_url}}. |
| Order Placed (COD) | Any Cash on Delivery order, from Shopify checkout or placed over WhatsApp. Use it to confirm before dispatch or to nudge customers to prepay. |
Order messages must use approved WhatsApp templates. The Automations page tells you how many of the 7 standard order messages still need approval. Click Create the N missing messages to submit them all at once. Approval runs in the background while you set up your automations. When all are approved, it shows that all 7 order messages are approved on WhatsApp.
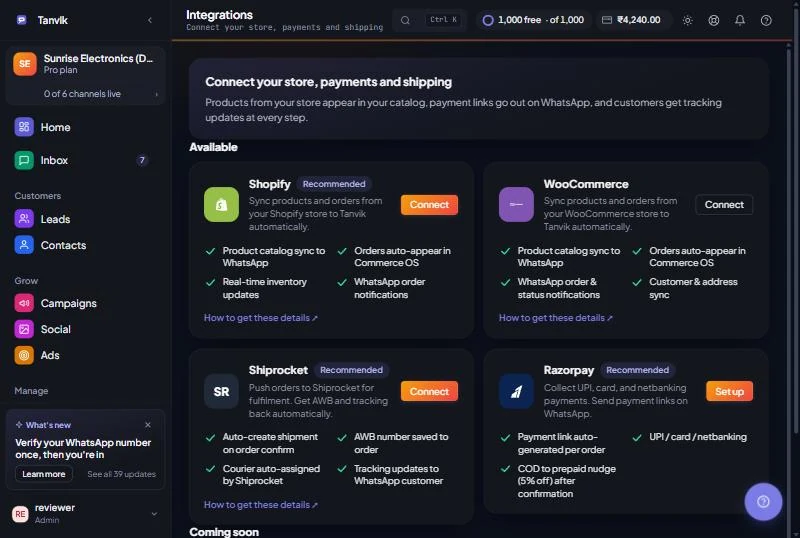
The All integrations page lists what is Connected (a green Connected pill, or Needs attention if the last check failed), what you can add (Available or Add more) and what is Coming soon. A connected row has Settings and, for most, Sync now. Inside Settings you can Save changes, run Test connection or Disconnect.
| Integration | What it does | What you need |
|---|---|---|
| WooCommerce | Syncs products, orders, customers and addresses. Sends WhatsApp order and status updates. | Store URL (with https://), Consumer key and Consumer secret from WooCommerce → Settings → Advanced → REST API, with Read/Write access. After connecting, click Register webhooks in Settings. |
| Shiprocket | Pushes orders to Shiprocket for shipping and brings the AWB and tracking back to the order. | Your Shiprocket account email, Password and Pickup location name (usually "Primary"). Copy the webhook URL shown in the card's settings (Copy URL) into Shiprocket → Settings → API → Webhooks. |
| Razorpay | Creates a payment link for each order, paid by UPI, card or netbanking. | Click Set up (or Payment settings once connected). It opens the Payment Gateway page, where you connect with your Key ID and Key Secret. PayU is also available there. |
Under Coming soon you will also see Delhivery, PetPooja POS and Shadowfax. These can't be connected yet.
| Problem | What to do |
|---|---|
| "Connect failed: Invalid credentials or shop domain" | Use the .myshopify.com domain, not your custom domain, and check the Client ID and secret match the same app. |
| "Enter Client ID + Client secret... or an Admin API access token" | Fill in one of the two options. Only one is needed. |
| The Shopify store tab is missing | It shows only while a Shopify store is connected. Connect Shopify first, then reload the page. |
| Data looks out of date | Check the Live sync card on the Overview tab. If something looks stale, click Force Full Resync (it re-pulls products, orders and customers). |
| Webhooks show fewer than 18 | Go to Webhooks & Settings and click Re-register all. This removes duplicates first. |
| A shipment never shows as delivered | The courier name probably wasn't recognised by Shopify. Use Update tracking and pick a courier from the list. |
Was this article helpful?