Capture leads with Forms
Use a web form anywhere you want people to leave their details: a contact page, a landing page, an ad, a QR code on a flyer or a link in your Instagram bio. Each form gets its own link and embed code.
When someone submits, Tanvik creates a lead with source Form, adds the tags you chose, assigns it to an agent, and can start a follow-up automation, so you can reply on WhatsApp while the lead is still warm.
- Web forms are available on every plan that includes Leads. WhatsApp forms need the Flows feature, which comes with the Pro plan.
- In the sidebar, open Automate and click Forms. If your workspace has both kinds, you see two tabs at the top: Web forms and WhatsApp forms.
- To enroll new leads into a follow-up sequence, create and activate that automation first. Only active automations appear in the form's list. See Build automation flows.
- To send leads to a particular person, make sure they've been added as an agent. See Add teammates and set permissions.
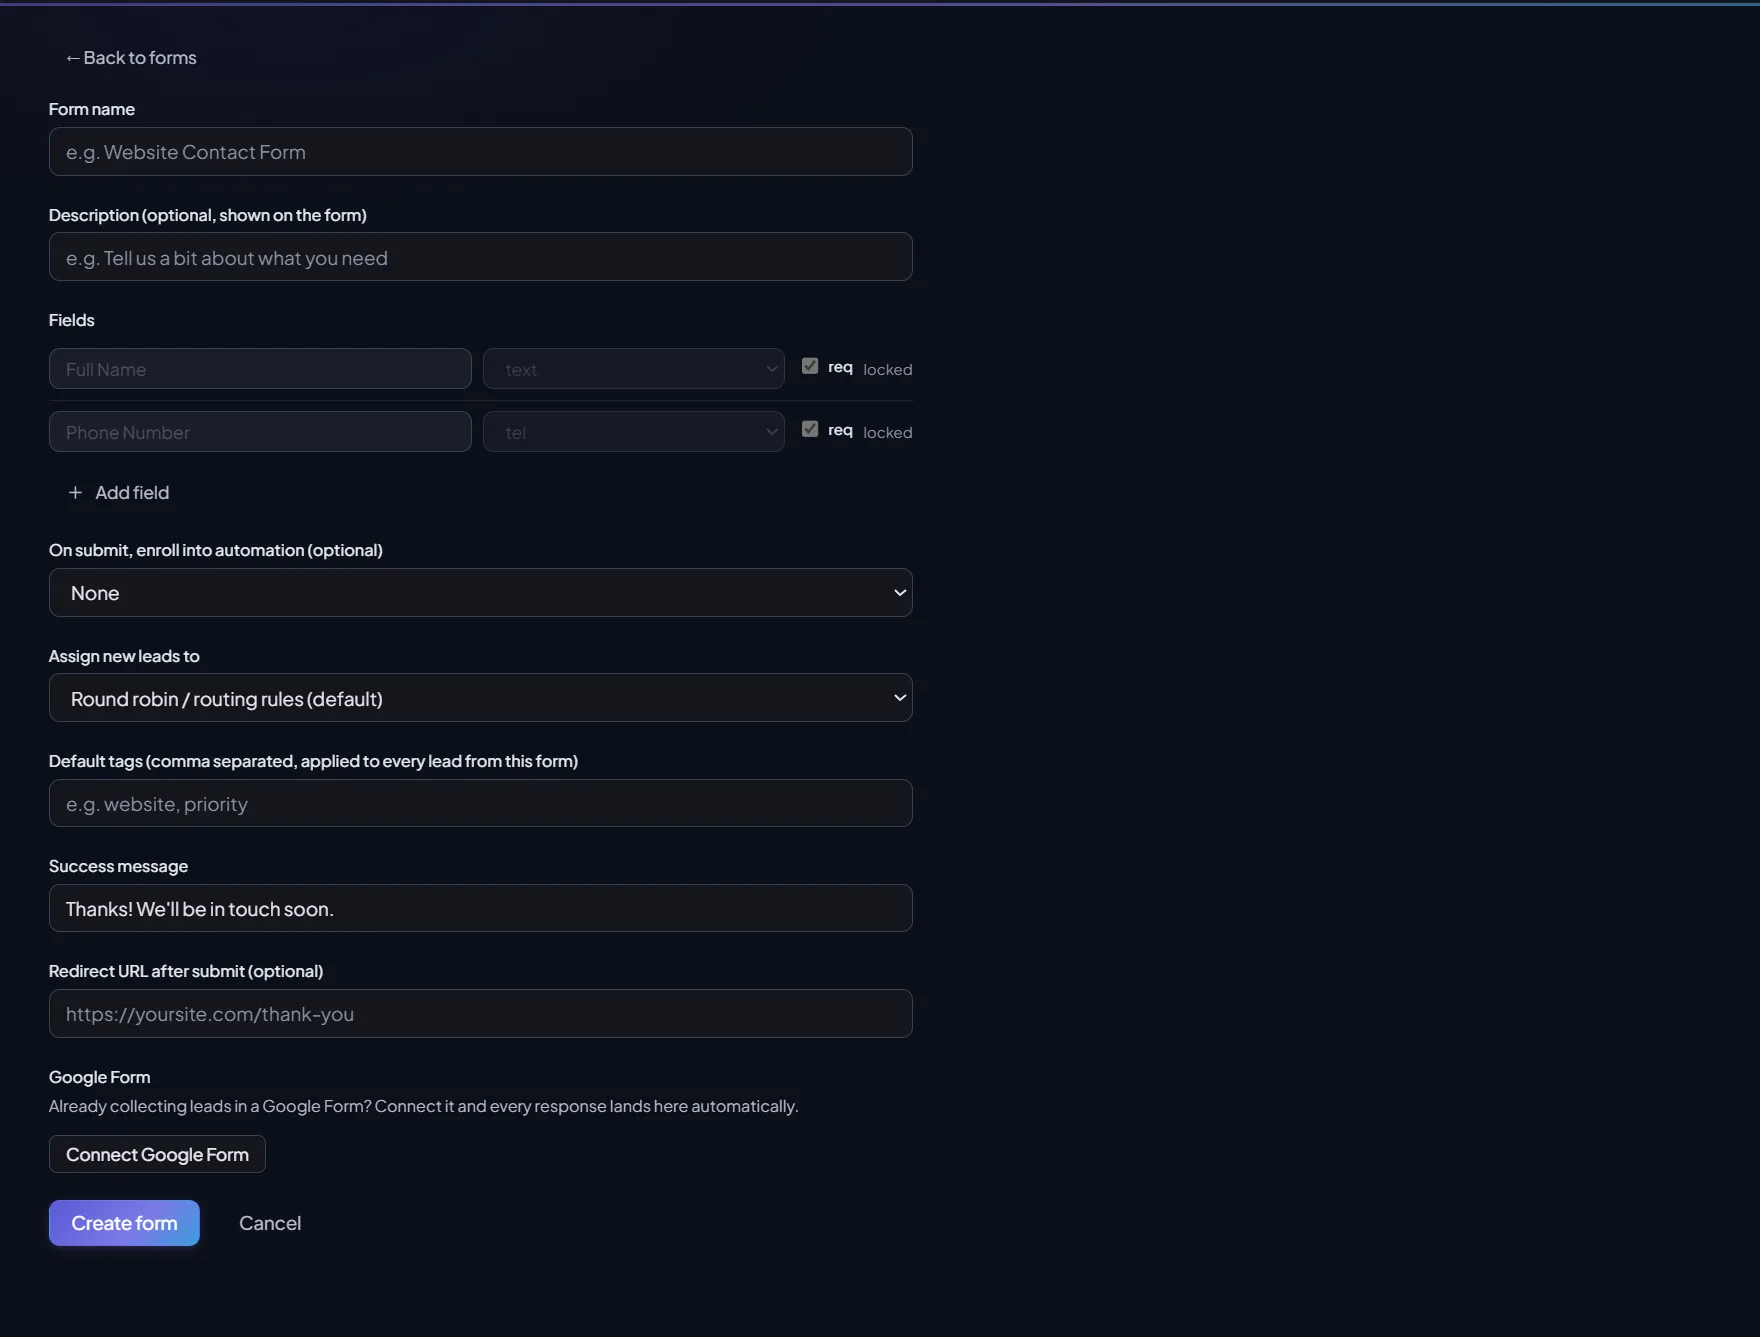
| Field type | Visitor sees |
|---|---|
| text | A single-line text box |
| tel | A phone number box |
| An email box | |
| textarea | A larger box for longer answers |
| select | A dropdown. Type the choices in the options box, separated by commas |
| Setting | What it does |
|---|---|
| On submit, enroll into automation | Starts one of your active automations for each new lead. Leave it as None to skip |
| Assign new leads to | Round robin / routing rules (default) shares leads using your normal assignment rules. Pick an agent to send every lead from this form to that person — they get a notification when a lead arrives |
| Default tags | Comma-separated tags added to every lead from this form, e.g. website, priority |
| Success message | What visitors see after submitting. Default: "Thanks! We'll be in touch soon." |
| Redirect URL after submit | Optional. Sends visitors to a page of yours, such as a thank-you page, shortly after they submit. Must start with https:// or http:// |
Every form has two ways to reach people. Both are on the form's card (Copy link, Copy embed) and inside the editor.
| Option | Use it for |
|---|---|
| Shareable link | A hosted page for your form. Share it on WhatsApp, social media, emails, ads or QR codes |
| Embed code | Shows the form inside a page of your own website. It resizes itself to fit |
| When someone submits… | Tanvik does this |
|---|---|
| A new phone number | Creates a lead at stage New with source Form, adds the default tags, assigns it, and enrolls it in the chosen automation |
| A number that's already a lead | Updates the existing lead instead of creating a duplicate — the new message is saved and the form's tags are added. Numbers are matched on their last 10 digits |
| Missing or invalid details | Shows the visitor an error, such as "Please enter a valid phone number." or "Please fill in all required fields." Nothing is saved until they fix it |
Open Leads and set the source filter (All sources) to Form to see every form lead. Your default tags show which form each lead came from. See Manage leads in the pipeline.
Open the WhatsApp forms tab (forms#whatsapp) to build interactive forms that open inside a WhatsApp chat: capture lead details, book appointments, run surveys or take sign-ups. They use Meta's WhatsApp Flows, so you design the screens in Meta Flow Builder and manage them here. This tab needs the Flows feature (Pro).
Use Retire to take a live flow out of use. Delete is only available on drafts.
Already collecting leads with Google Forms? Link it to a Tanvik form and every new response becomes a lead — with the same tags, assignment and automation as a web submission.
Save your Tanvik form first, then click Edit on it and use Connect Google Form. The full steps are in Connect a Google Form.
Each form card shows Views, Submits and Conv. (the share of views that turned into a submission), plus these actions:
| Action | What happens |
|---|---|
| Edit | Change fields and settings. The link and embed code stay the same |
| Pause / Activate | A paused form shows visitors "This form isn't available". Activate it to accept submissions again |
| Delete | Removes the form. Leads already captured are kept, but the link and embed stop working for good |
| Problem | Fix |
|---|---|
| Visitors see "This form isn't available" | The form is paused or was deleted. Click Activate on its card |
| My automation isn't in the list | Only active automations appear. Activate it on the Automations page, then reopen the form editor |
| A repeat customer's automation didn't start | Automations start for new leads only. A number that's already a lead is updated, not re-created |
| The form doesn't show on my website | Paste both lines of the embed code, and make sure your site builder allows scripts in that block |
| "Give the form a name first" | Enter a Form name before you click Create form |
Was this article helpful?