AI & Automation
Connect your own Vaani account
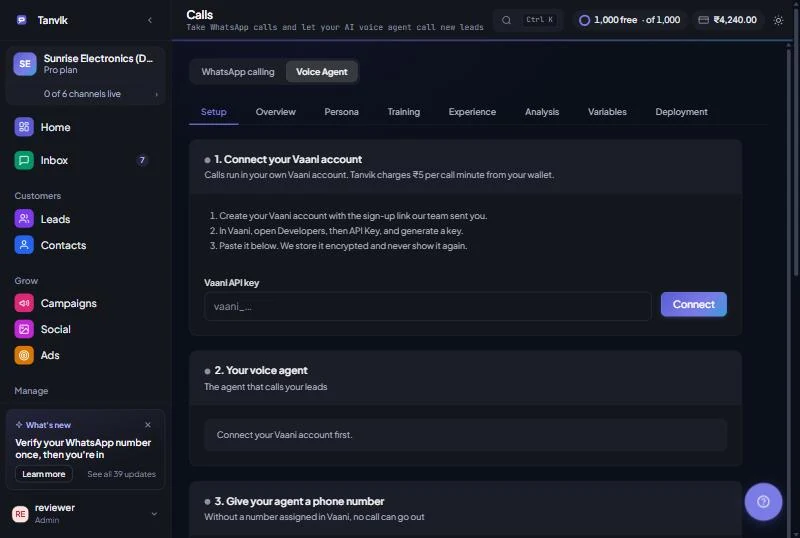
Your Voice Agent can run on your own account with Vaani, our voice-calling partner. The Setup tab walks you through it in six steps: connect your account, create the agent, give it a phone number, send call results back to Tanvik, place a test call and, if you want, let the agent use Tanvik during a call. Do it once and the agent is ready to call your leads.
What you need
Before you start, have these ready:
- The Voice Agent switched on for your workspace. Open Automate → Voice Agent. If you do not see it, tap Request activation on the Voice Agent card in your dashboard setup list.
- A Vaani account. Create it with the sign-up link our team sent you.
- Money in your wallet. Every call costs ₹5 per minute, charged to your Tanvik wallet when the call ends. The Setup tab shows the price before you place the test call.
- Two browser tabs: Tanvik and your Vaani dashboard.
No Setup tab? Then our team connects the agent for you and there is nothing to do here. Go to Set up your AI Voice Agent to tune what it says.
The six steps
Each step has a coloured dot: green when it is done. The steps unlock in order, so a step says "Connect your Vaani account first" or "Set up your agent first" until the one before it is done.
01
1. Connect your Vaani account
In Vaani, open Developers, then API Key, and generate a key. Back in Tanvik, paste it into Vaani API key and click Connect. Tanvik stores it encrypted and never shows it again. Once connected the step shows the end of the key. To change it later, paste a new key and click Replace key.
02
2. Create your voice agent
Under Start from choose Lead follow-up (recommended) or Blank agent, type an Agent name and click Create agent. The Lead follow-up template comes with call outcomes, detail extraction, voicemail detection, a 5-minute call limit and a pricing rule already in place. Already built an agent in Vaani? Click Show my Vaani agents, pick one (unpublished ones are marked "(draft)") and click Use this agent.
03
3. Give your agent a phone number
Without a number, no call can go out. In Vaani, open Design, then Telephony, and click Add Phone Number. You can buy a number from Vaani or bring your own. Back in Tanvik, type that number and click Attach number. Tanvik sets it as the agent's outbound line. People you call see this number. To switch numbers later, click Change number. The same card is on the Deployment tab.
04
4. Send call results to Tanvik
This is the step that puts each call's summary and outcome on the lead. Vaani has no way for Tanvik to do it for you, so you add the address in the Vaani dashboard: open Settings, then Developer, then Webhooks, and click New End Point. Paste the address from Tanvik as the URL (use Copy). Keep it private: it identifies your workspace. If Vaani asks for a signing secret, paste the one Tanvik shows. If it asks which events to send, choose all call events. The step turns green by itself when the first call result reaches Tanvik. Click Check again to look right now.
05
5. Place a test call
Type your own mobile number and click Call me. Tanvik shows "Calling you now"; pick up to hear your agent. Calls go out between 8 am and 8 pm IST. It is a real call, so it costs ₹5 per minute. Do steps 3 and 4 first, or the call cannot go out and its summary will not appear in Tanvik.
06
6. Let the agent use Tanvik during calls (optional)
Click Show connection details. In Vaani, open Design, then Tools & Actions, and add a tool for each action listed by pasting its cURL, then describe when the agent should use it. With these the agent can look up the lead, send a WhatsApp message, update the lead or book a slot while the call is live. WhatsApp messages sent this way are charged to your wallet. Keep the token private: anyone with it can act on your leads.
How you know it is working
When steps 1 to 4 are green, the agent is live. On the Overview tab:
- Vaani account says Connected, and Agent config shows your agent ID.
- The warning "Your voice agent isn't live yet" is gone.
After that, tune the agent on the Persona, Training, Experience, Analysis and Variables tabs (see Set up your AI Voice Agent). Each call's summary, outcome and recording then land on the lead.
Common problems
Step 4 will not turn green
Tanvik can only tell the address is working when a call result arrives. Make sure the address is added in Vaani under Settings, then Developer, then Webhooks, place the test call in step 5 and pick up, then click Check again. If you see "No call result has reached Tanvik yet", the call has not finished or Vaani has not sent it.
Connect does not accept my key
Generate a fresh key in Vaani under Developers, then API Key, and paste the whole key again. The key is checked as soon as you click Connect.
The test call does not ring
Check that step 3 is green (a number is attached), that the time is between 8 am and 8 pm IST, and that your wallet is not low. If the wallet cannot cover a minute, the card says so and the Call me button is disabled. Top up your wallet and try again.
Calls are paused
Your wallet cannot cover a call minute. The Overview tab shows how many leads are waiting. Top up and calls resume on their own.
I changed the voice in Vaani
Open any tab of the Voice Agent and click Refresh from Vaani to pull the current settings.
Was this article helpful?